Step 1: Grab tissues.
Step 2: Find a Kmart or any layaway this holiday season.
Step 3: Give thanks for all the blessings taken for granted each day.

Wednesday, December 21, 2011
Tuesday, December 20, 2011
Lil' Miss Madeleine

Good Morning out there!
My name is Miss Madeleine. This is my story.
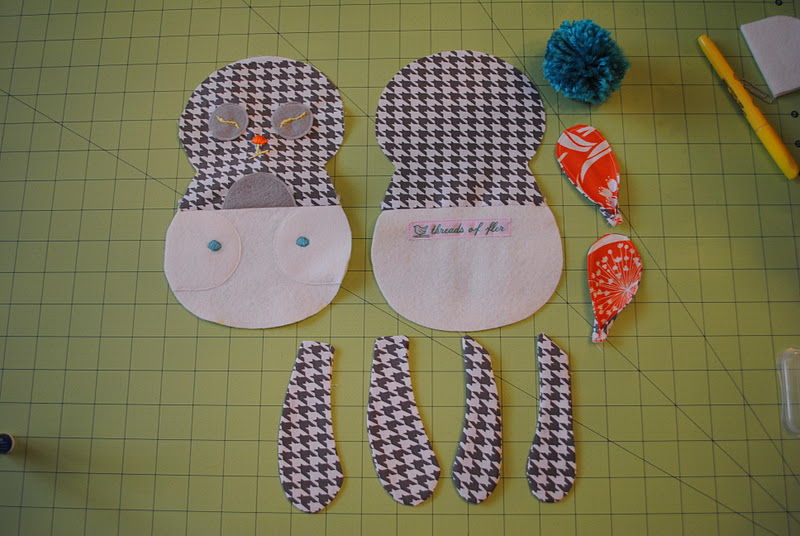
One day Fler was asked to make something vvvery special for one of her best friend's preggo lil sis. Fler put on her thinking cap. She thought. Thought. Thought.
Voila! She had a very special idea.
Over at Etsy.com Fler remembered "The Greta Doll"
My new mama has beautiful and long curly red hair. I wonder what baby MacKenzie's hair will be like. I have fuschia pink hair! My hair stylist works WONDERS with color.

Fler is an ER nurse. Thank goodness because I had a lot of stitching to be done (kinda like those suture things in the ER when people cut themselves). As you can see, I was in trouble because my arms and legs weren't attached to me yet. Talk about DIFFICULT when trying to put my pretty gold and brown bow in!!!


Ahhh...my arms and legs are attached to me! Phew. Miss Fler was surprised at how big I was getting so she measured me. Wow, I'm a big girl, but I was feeling a little "flat".
Fler knew just what to do to get me all perked up!

Oh I feel so much better. Fler says she feels flat in the morning until she has her cup of warm. What's cup of warm??? Oh, that's coffee.

Fler says first thing every morning it's important to spend time with Jesus. I think that is a good lesson especially since it's the Christmas season when the whole world celebrates Jesus being born.

For nap time Fler read me a story about Olivia. Fler says Olivia is their favorite character in the house. She says they collect all the stories about lil' Olivia. I was really tired. It was such a long day. I mean, I didn't have arms or legs attached!!! Imagine a day like that! Fler made me a special blanket to sleep with, but she calls it something else??? Hmmm....oh my, what does she call my blanket again?
Oh yea, a burp cloth! That doesn't sound too pretty. You know, pretty like my tights.
After my nap I went on a plane ride to Chattanooga, TN. I met my new aunties and mama. My auntie says my new mama looked at me and started tearing up.
I love my new home. I can't wait to meet lil MacKenzie!!! I hope she loves me and cuddles me. I wonder if she will read me books one day just like Fler?
Well, it is time for my nap so I have to go. Thanks for stopping by to meet me.
Merry Christmas everyone!
Lil' Miss Madeleine
Tuesday, December 6, 2011
Whimsy Stockings and...a Little Tutorial!

A few weeks ago I was doing my usual breeze through catalogs while the hubs was watching some sporting event on TV. I was looking at the Ballard Designs holiday catalog when ESPN hubs said he would love it if I could make these:

Neither of us were loving the animal print trimming the stockings. I loved the whimsy concept but had to take it a step further with a little "fler" twist!

My first step was to create a pattern. I used old, not-so cute wrapping paper to free hand our design. I then traced it onto flannel material with my chalk pen. Since the pattern was the actual size of what I wanted it to look like finished, I cut about 1/2 inch from the outline and added about 4 inches to the top to be the area where my stocking cuff would be.
I used several tutorials to help me.
The main tutorial I used is HERE.

Now that you have your flannel (front) side template cut out you want to cut out the backside of your stocking. Put your right sides together and cut out the backing fabric.

Next I made the stocking lining. The lining is really nice because it adds some weight to the stocking and less flimsy. To cut out your lining. Have your lining fabric wrong sides together, place your template on top and cut your lining out.

You should have both the front/back of your stocking plus your lining cut out. I then used my Silhoutte SD and cut out white flannel circles with the Clean Cut Nonsewable Interfacing (also from Silhoutte). Lay your circles out and juggle them around till you find the layout you like. Make sure you trim edges if your circle hangs over your stocking front (notice the trimmed dot around heel). Next you want to iron those bad boys on! The packaging said just 8 seconds but I think I might have overdone it out of fear they'd fall off!!! LOL I think 8 seconds would have been fine....ha!

Time to add the pom poms! I just love these little guys. What you want to do is take the front/back of the main stocking and front/back of your stocking lining and lay them right sides down (note my wrong sides showing on top in picture). Lay your pom pom strand (bought those snow puffs at Joann's) across the top and cut proper length. You will cut 2 strands (one for main stocking and one for the lining so that you pom pom embellishments go around the whole cuff of your whimsy stocking). IMPORTANT: Do not have a pom pom exactly at the edges because you will have to sew here. I learned this the hard time with our red stocking. Try to get as much webbing without the pom pom on your edges to make sewing easier.

Now place your pom pom strand sandwiched between the right sides of your main stocking fabric top edges and pin. The wrong sides should be on the outside. I found that leaving the little knots of the pom pom strand out a little made pinning easier and created just the right look when I turned our first stocking inside out. You will repeat this same step with your stocking lining fabric pieces.

Pinning this part is kind of a pain, but once you're done it should look like this. I pinned at each knot that I showed sticking out in the previous photo. Now you are going to sew.

I know the legit seam is wider than what I do but I just feel like that's a waste, so I did 1/4 inch seam and then sewed another line between the edge and my seam to add reinforcement because...well I really have no reason why. It just seemed like a good idea! ha! I bet there might be some pro-seamstresses gasping at my seam choice and reasonings...LOL! Do this for both your main and linings.

Iron your seams out. Cute eh?!?! So far so good. Hope this is making sense to ya!

Now we're going to put the right sides together of our main stocking and lining. Once placed together my fabric on the bottom in the picture will ultimately be my lining. I pinned all the way around, but in the lining (the bottom portion), I left about 4-5 inches open/unpinned so that I have a way to turn it inside out.
Now sew all the way round except where you left the opening unpinned. On the green flannel, I sewed along the original chalk markings I traced my wrapping paper template on.
Once your are done sewing, turn your stocking inside out and press your seams with an iron.

Before sewing your opening closed, take some fiberfill and stuff your stocking toe. If you don't your whimsy will look a little flimsy. IMPORTANT: when stuffing your toe, pull apart your stuffing so it's small sections of stuffing. This will give the finished stuffed toe less lumpy. If you pull off too big of chunks your stuffed stocking toe will look all bumpy and not smooth.
Once stuffed, you now going to stuff your lining into your main stocking. Once your lining is in place, fold over your cuff and press. Your stocking should look like this:

Press your cuff in place. For your hanging piece, I just hand stitched a piece of red ribbon I had into place.
YOU'RE DONE!!! Now run into your family room and hang it up to admire! I was so proud of my first stocking. Lots of help from the blog world pictures and tutorials, but feel like I put my own stamp on the design. ESPN hubs LOOOOVES his new stocking! I honestly think that's the best part...his excitement over it. He said he thought it was better than Ballard's and better than what he envisioned in his head. Oh that makes my heart melt!!! GAG right?!?! Seriously, the gifting is the best part!

So when I hung up the stocking I noticed it looking kinda wimpy. I found a post from one of my FAV blogs, POSITIVELY SPLENDID, where she had the same problem and shared her solution...GROCERY PLASTIC BAGS!!! She stuffed her completed stockings with plastic grocery bags. See the difference between the red stocking (stuffed with bags) and the green (whimpy whimpy...unstuffed).

They hang so nicely stuffed with those unused, take-up-space, mess up under your kitchen sink, plastic bags!

We love our new whimsy stockings! We added a bit of whimsy to our mantel this year too. The printable on the far right is FREE over at Today's Creative Blog.
I hope you enjoyed the tutorial and that it didn't confuse you too much. I highly suggest you look at the tutorial I worked from as she did an AWESOME job on hers. Made our stockings much easier than if I had tried on my own!

Melkam Gena!!!
(Merry Christmas in Amharic which is Ethiopia's main language)
xoxo & Ho! Ho! Ho!
fler
Monday, December 5, 2011
Buy a Brick. Build a School.
This might be one of the cutest videos. Zala's voice is a fellow AGCI momma's daughter's voice, Liya. Consider buying a brick this Christmas Season!
Melkam Gena!
(Merry Christmas in Amharic - main Ethiopian language)
Sunday, December 4, 2011
I'm Racing for Gina and Abby!

Hi Everyone,
I just signed up for the Race for Donna in Jacksonville, FL on February 12th, 2012. I am part of Team Gina. Gina McReynolds is the wife of Tim's childhood friend who was diagnosed with breast cancer while 28 weeks pregnant with their third little. Her little bub just turned one and she is still fighting with an amazing faith and fearless attitude. In addition, Heidi and Becca (my sisters 'in laws'), have a dear friend who is 28 and just graduated law school. In October, she too was diagnosed with breast cancer. I cannot imagine being young like these women, having bilateral radical mastectomies and then fierce chemotherapy.
Please consider sponsoring me on this run. It's my very first half marathon and first run I am taking seriously and training. I am taking the training seriously because Gina and Abby are special women in a sea of many other brave women who have or are battling breast cancer. Please select the link above for more information on Gina and how you can sponsor. Any help is beyond appreciated. Please feel free to share this email and link with others.
Much love,
Erika Reiner
Wednesday, November 30, 2011
Sneak Peek of Whimsy Stocking...tutorial to come!

Happy Holidays Everyone!!!
I know it's been a while since I've posted...there's been a lot going on in our little wonderland! We hope you had an amazing Thanksgiving!
I have a tutorial on its way! The hubs saw the below stocking in a Ballard Designs catalog and placed a special request for our mantel this Christmas.

I made my own design changes to make them my own but aren't the above adorable if you don't sew and are looking for some FABulous stockings?!?!? I love a little whimsy!
xoxo
Ho! Ho! Ho!
fler
Saturday, November 5, 2011
Heeeeere's Johnny!!!
Remember Johnny Flopperstein
HERE ?
Well Johnny has a new mama officially!

I think they look pretty cute together eh?!?!
Johnny is currently waiting on Baby T to arrive. He's really excited to be snuggled and played with!
Marla, so happy you love your Threads of Fler goodies, but I'm especially excited that you love Johnny Flopperstein as much as we do!
xoxo
fler
Sunday, October 16, 2011
Johnny Flopperstein and some other fun stuff!

Hola from fler!
We received more flowers this weekend so I thought I would share before getting started! LOVE ORANGE!!!

I love this pic! Hard to imagine it is 5 years old!!!
One of my besties, second one in from the right (Heather) next to me, asked for some Threads of Fler for her sister's baby shower. BUT OF COURSE!!!
Their little's gender is going to be a surprise at the delivery, but I knew her nursery colors (Grey and White with splashes of Aqua and Tangerine....SOME OF MY FAVs...hello new dining room!!!).


This was a really fun gift to put together...so fun!

Now, I know what you are thinking...TOTALLY not her nursery colors, but I fell IN LOVE with this fabric from The Little Fabric Shop (click on button in right side of blog for hyperlink to store). The collection is called Pinella's Journey. Our home has big plans for this collection...stay tuned!
I began with making a couple burp cloths and a bum cover. The bum cover tutorial can be found at: MADE.


A few detailed shots!
And now for my FAV project I think to date!!!
HERE'SSSSSSSSSSSS JOHNNY FLOPPERSTEIN!!!
I found this "Baby Binky Bunny" on Etsy at MMMCrafts. I started with more of the traditional concept as shown in the PDF, but that's not my style to "stay between the lines".
I mixed things up!
I used grey houndstooth material with an orange quilt remnant. Normal cotton tail??? FORGET IT...we went with aqua! Mr. Flopperstein is technically gender neutral for Marla's little AND he's in suit with her nursery colors.

Little Johnny slept through the whole assembly process! What a sweet Little. Also, no buttons on his diaper...don't want Marla's little to possibly choke. We went with embroidery in place of buttons.


Johnny Flopperstein ready for some stuffing...Oh, I LOVE HIM!!! I mean, I really do...he is sooo precious! Tim is a HUGE fan too. In fact, Tim is who named him...I couldn't agree more with the perfect name!
Ok, Marla can change it if she likes, but to us, he'll always be Johnny Flopperstein!

Look at that cute bum! I reinforced all his ears, legs and arms with extra stitching to last many years of love and giggles.

Johnny all stuffed and ready to go to his new home. Can you believe it, HE IS STILL SLEEPING!?!?!

No bunny is complete without their signature cotton tail! Aqua of course!

Tomorrow Johnny Flopperstein sets out on his voyage with burp cloths and a bum cover to Atlanta, GA. I certainly hope he is loved at his new home. We send him and the goods with lots of love and hopes for many snuggles and giggles.
Good-bye Johnny!
xoxo
fler
Wednesday, October 12, 2011
Thankful in All Things

I am thankful. Of recent I have really been focusing on thankfulness. We have recently received a lot of flowers and they are SPECTACULAR.
God is good. All the time. In all situations. God is good.


Beautiful!

I wanted to create something for fall to decorate the house with as we move into the holidays and consider all we are thankful for.
My inspiration was this FALL PILLOW .
I was going to do exactly the same thing with some leftover scraps from last year's Thanksgiving Napkins project. You can see the napkin project HERE .
However, once I started pulling out my scraps, I decided to make my own fall pillow with the theme of Thankfulness. I used my good ol Silhoutte to create these super cute trees. I like how randomly the green oval polka dot fabric cut out captured a little blue bird.


I decided we needed some grass.

I used fusible fabric interfacing behind all my shapes to iron them to the pillow cover. I figured this would add additional stability to sewing the shapes onto the cover.

I used dark color fabric heat transfer material for my "thankful". I cut out my "thankful" from my Silhoutte. Since this project is a seasonal item, the heat transfer material should be just fine. If this was going to be used more months than not, I think I would have stenciled and painted the word on the cover instead.

I used one of the tree's fabrics for the back of the pillow cover to add a little interesante'! LOL...or "interest" for the layman. Ha!

Ironed my finished Fall Thankful Pillow Cover and we're ready to rock!

I used a small pillow form from a pillow I wasn't using as my insert. I love that I didn't have to purchase any materials for this project since I had all these scraps from previous projects...YAY! CHEEEEEEEEEAP!

Fat n Happy


Couch in the Living Room???
or....


...should we place it on the antique chair??? Decisions. Decisions. Ha! Ha!
I also found this pretty and FREE October printable at DEAR LILLIE'S SHOP.

LOVE THIS!

Just the right touch we needed for our fireplace mantel. Ohhhh that mantel....a FOREVER work in progress.
These simple reminders around the house help me remember to be thankful in all circumstances because God IS good.
xoxo
fler
Subscribe to:
Posts (Atom)