Monday, January 23, 2012

B is for B-O-Y

....Snakes and Snails
and
Puppy Dog Tails
That's What Boys are Made Of

My dear friend asked me if I'd stitch up a few somethings for her bestie's soon-to-arrive little. Let me think for a second..........WELL OF COURSE!!! I would love to!

I know her bestie and she is really one of the most hilarious people I know. If you know E, then you completely know what I am talking about and there might be a hot pink feather boa involved! HA!

What to make? What to make?

I was taking a break from house cleaning one day and surfin the web. I came across the word "SWAG". It hit me!
I hopped over to my Silhoutte Studio and found an image and added some wording {far right onesie}.

For the caboose of this wagon, I couldn't resist...
Oh my goodnes!!! HILARIOUS!!! {not "Hello" in Spanish, but slang for "Holler"...I had to clarify for my mom...LOL}
Now, some of you might think, "Yea, um...how is that funny?!?!"
Do you remember the Toyota Mini-Van commercial? No?
Well let me refresh your memory:
Hilarious right?!?! If not, then something might be horribly wrong OR I am just a big dork which is highly likely.
For E's second onesie gift I again used my Silhoutte and cut out a B for BOY {and her son's name} and a mustache because that was part of the pics my dear friend pinned as inspiration for her shower decorating. LOVE IT! Can't wait to see pics of her shower.

The final onesie, which I LOVE is the bowtie for the Little Man.
I modified a tutorial I found HERE to make Little Man B's very manly onesie. It's a real bowtie that is all sewn and I just tacked it to the onesie. When Little Man gets older the bowtie can be removed, add a clip to the back, and he can wear it to church or to his presidential debate. He just might be the next president!
I finished little man's gift with a burp cloth. This time I placed cloth diaper material between super cute stripped cotton {nursery colors} and soft flannel. I'm waiting for a full report back from E on this modification. Of course, we need little man here to test that one out!
Sometimes I use matchy matchy thread but usually I go with a contrasting thread...this time I used orange thread.
Oh, I seriously loved making Little Man's gift!!! Each time I put a little gift set together I can see the person's personality in them. Furthermore, they are all one-of-a-kind which I LOVE!

My dear friend also asked me a while back if I'd stitch her up a camera strap cover. Her hubs wasn't too keen but finally agreed.
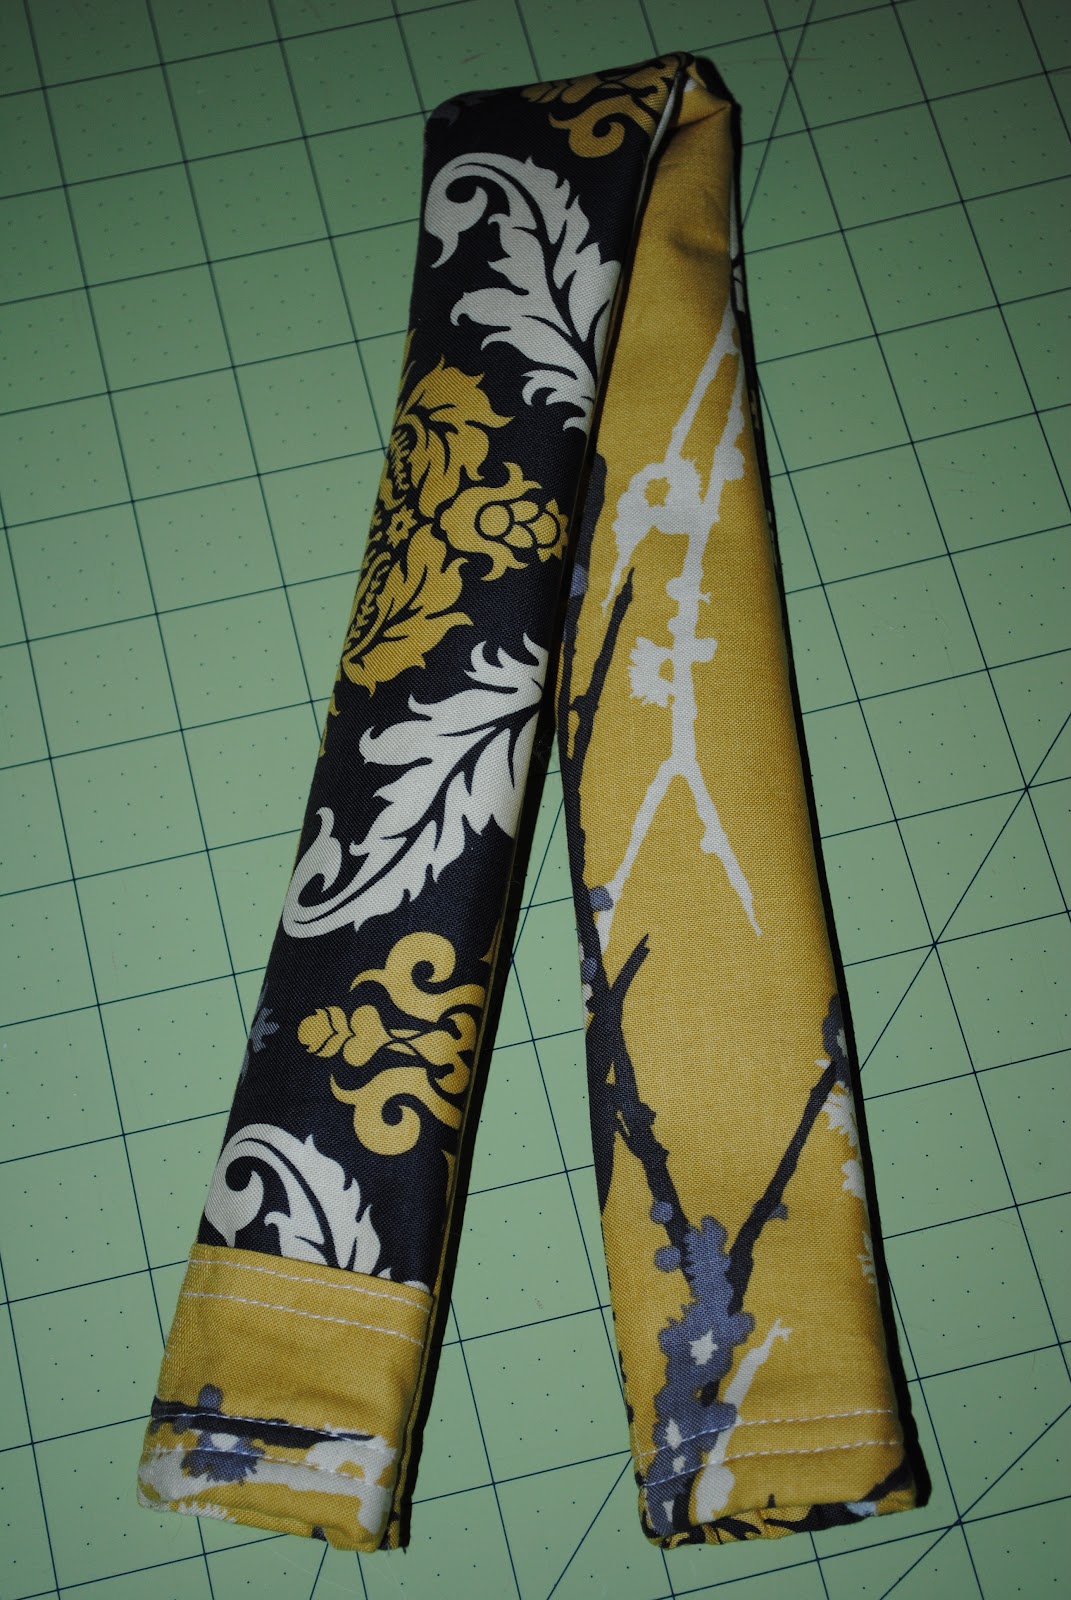
I had made one for myself back in September 2011, but the tutorial I used didn't work out well for the lens pocket. The pocket ended up being too small so it's basically useless, but I did like the overall design. I just needed to make some adjustments to the measurements.
"A" had picked out the fabrics she wanted from the fabrics I already have. I kind of have an addiction to collecting cute fabrics. I really need to just sew from what I already have and QUIT BUYING MORE! lol
This is a really old picture of my fabric cabinet. It barely closes these days. Fabrics are stuffed to the top, and then some, on each shelf! I've had to start another cabinet for fabrics. OYE VEY!


Drum roll pleeeease.....
 
IT WORKED!!!

I hope her hubs doesn't mind but I used a really soft flannel material for the underside of the camera strap. Between the fusible fleece lining inside and the soft flannel, this should make a comfy camera strap. I will let you know what they think about the strap and my modifications.

I can't wait to hear how this weekend went with E's manly mustache baby shower!

xoxo
fler


Pinterest really is an amazing thing. You can find anything on there: inspiration, tutorials, recipes, etc. I found THIS tutorial and added some width to the measurements noted.
My biggest worry was getting the lens pocket right this time.

Sunday, January 8, 2012

He Loves His Boy-Ville!

Honestly, this got me choked up last evening. 
I love making something unique and special for those I love. 
Cute or what?!?!? The overalls...TDF! Who knew they would make the perfect pouch to carry his Super Heroes??? I guess it's good to keep them with you in case they need to immediately save the day! HA!

I miss them soooo much!!!

On the bottom of his super heroes I sharpied a heart and signed "fler" with the year.
Boy-Ville
Here's the link to my post about it: 

xoxo
fler

Friday, January 6, 2012

You Got Swagger???

One of my FAV commercials is:
SWAGGER WAGON
Oh my word this is HILARIOUS!!!

A friend asked for some special "Threads of Fler" for our friend (her lifelong bestie) who is having a little boy soon. There'll be more to show later, but yesterday I was online and saw the word "Swagg". 

I had an idea!

I ran to my trusted Silhouette SD and found a wagon image, arranged and colored it in like I wanted. I then selected the font I wanted and filled the letters in. 

Voila!
Front 
(which the Hubs pointed out it should have been "Swagg'r" and not "Swagg'n"...oops note to self, but still funny)
Back

This CRACKS ME UP!!! She will totally love this onesie for her soon coming little man. 

xoxo,
fler
Holla!

Thursday, January 5, 2012

Boy-Ville...Super Heroes to Save the Day!!!

Boy-Ville
What's that???
I follow this blog called Lil Blue Boo (click on this link to get to the tutorial and free printable) .
A while back she posted a tutorial on Boy-Ville. Loved this idea!!!!

My bestie has a son who is just over 2 and HILARIOUS! I called the other day and he sand me Jingle Bells followed by saying, "Boo-Yah"! So funny! His mom is beyond funny and super creative so I am really not surprised by how much personality he has. Love watching him grow up and see that personality come through.

Anyway, I knew this was just the perfect Christmas gift for him.

I went to Michael's to get these blank wooden figurines. I used a pencil to draw up each hero. I haven't really drawn for a long time so this was a stretch.

I painted section by section, letting each section dry before going on to the next. You might have to do a couple coats and touch-ups. I thought I could do them perfectly first time around...don't stress yourself. Believe me...You'll NEED to do touch-ups!
Even with touch-ups there were imperfections. The acrylic paint dried really flat so I remembered I had some clear gloss enamel spray paint. The gloss also helped hide some of the mistakes I made...BONUS!!!
The super heroes took a break for some Florida sunbathing! Ha! Even Super Heroes like a little poolside.
I placed the printable onto thick cardboard paper with spray adhesive.
I bought a Christmas tin at Joann's when they had their big sale and used it to hold all the Boy-Ville parts. I used some blue construction paper and spray adhesive to cover the red snowflake.
To get the phone booth and treasure chest to stand I made little triangles and photo mounting tape on the backs.
I love the pirate the best though they are all cute, just love him!
These Super Heroes are fast on their way to Rockford, IL to surprise a RIOT of a kid.
I hope he loves his new friends to play with!

xoxo
fler

Brrr...it's Chilly Outside

"Yeah. Yeah. Yeah. You live in Florida," you say.
Well listen, for real, it was in the low 20's Tuesday night and mid to low 30's last night. If we'd had any kind of rain Tuesday night we would have had SNOW! Wild. And....SUPER COLD. Ha!

Staying true to myself, this year I bit off more than I could chew this Christmas. And.....well, it was TOTALLY worth the end result!

In September I had this idea that I would make quilts for both moms and both sister-in-laws.  I was going to make them by hand. Had I ever sewn a quilt???? Um, nope!

So I gathered all my books which talked about quilting and scoured the blogs I follow for tips. I ordered all the fabric for each quilt and purchased all the materials.

Insert...overwhelmed.

Then I decided to make just the tops and have someone else quilt. P.S. By the time it's late October all the quilters are jammed packed with quilts to do. I was back to doing them myself.

My first quilt was Becca's. I love the fabric! Becca and I are very into Anthropologie and this fabric was just the right style! This was really a tough project for me. The binding wasn't too bad until I got to the corners...OYE VEY!

You can't completely tell, but the corners were pretty messy, but being my first quilt ever...I was really excited. I couldn't wait till Christmas to give this her so I cheated. Which was perfect because she traveled to DC and Denver with it. Makes my heart melt that she loves it so much.

Next was Heidi's quilt. I picked bright and vibrant colored fabric because if you know Heidi, she loves bright colors and is incredibly adventurous. I quickly got the top completed but didn't bind or quilt till week before Christmas.
Note to Self: don't try to make 3 quilts the week before Christmas...you might get stressed. HA!
Her quilt turned out so pretty. Her corners were a little better but still had a long way to go. I actually did wait till Christmas to give it to her. She loves it. It's come in pretty handy with the weather we've been having.
Next up was Mom Reiner's. Tim helped me pick out her fabric. I feel like if you knew each of these wonderful women and you saw each quilt, not knowing who was getting which one, you would be able to match the quilt based off the fabric. Love that!
This quilt is beautiful! I loved the backing on this one too.

I finally got my perfect mittered corner!!! Only took 3 quilts to get there, but I got there!!!

Each quilt takes roughly 16-18 hours based on mistakes and squaring off things etc. From start to finish they take a lot of love and time.
Thursday before Christmas I started mom's. OYE VEY!!! The pressure was on. When I first picked out these fabrics and received them I was nervous. I loved the colors because they are so mom (and I love them too), but was nervous they wouldn't mesh for a quilt.
 I love how her quilt turned out!!! I had one extra fabric style so her quilt was slightly larger than the others. They are each throw size. Perfect for snuggling on the couch, reading a book or catching a flight to D.C.!
The backing fabric is really cool too on mom's. It has these lighter brown linen looking brush strokes. Mom loved her quilt. She's taken it everywhere. I may have even received a "few" texts telling me all about it. HA!
Here's mom all snuggled in opening some Christmas bling from dad with Grandma looking over. So cute!

I have yet to get a picture with all of them together with their quilts, but it's on my radar. I loved making each of these quilts. Each one is so special and unique. I think I should plan my time a little better next time I take something like this on, but wow...loved giving these gifts.

Speaking of Sewing...Santa brought me something very special from the hubs this year...
A serger!!!
Don't judge our dining room table...Christmas quilting was ALL UP on that table!!! It's clean now....promise!

xoxo
Hope you all had a very Merry Christmas!
fler

Wednesday, December 21, 2011

Be an Angel for Someone in Need this Holiday Season

Step 1: Grab tissues.
Step 2: Find a Kmart or any layaway this holiday season.
Step 3: Give thanks for all the blessings taken for granted each day.

Tuesday, December 20, 2011

Lil' Miss Madeleine

Good Morning out there!
My name is Miss Madeleine. This is my story.
One day Fler was asked to make something vvvery special for one of her best friend's preggo lil sis. Fler put on her thinking cap. She thought. Thought. Thought.
Voila! She had a very special idea.

Over at Etsy.com Fler remembered "The Greta Doll"
My new mama has beautiful and long curly red hair. I wonder what baby MacKenzie's hair will be like. I have fuschia pink hair! My hair stylist works WONDERS with color.


Fler is an ER nurse. Thank goodness because I had a lot of stitching to be done (kinda like those suture things in the ER when people cut themselves). As you can see, I was in trouble because my arms and legs weren't attached to me yet. Talk about DIFFICULT when trying to put my pretty gold and brown bow in!!!

Ahhh...my arms and legs are attached to me! Phew. Miss Fler was surprised at how big I was getting so she measured me. Wow, I'm a big girl, but I was feeling a little "flat".
Fler knew just what to do to get me all perked up!
Oh I feel so much better. Fler says she feels flat in the morning until she has her cup of warm. What's cup of warm??? Oh, that's coffee.
Fler says first thing every morning it's important to spend time with Jesus. I think that is a good lesson especially since it's the Christmas season when the whole world celebrates Jesus being born.
For nap time Fler read me a story about Olivia. Fler says Olivia is their favorite character in the house. She says they collect all the stories about lil' Olivia. I was really tired. It was such a long day. I mean, I didn't have arms or legs attached!!! Imagine a day like that! Fler made me a special blanket to sleep with, but she calls it something else??? Hmmm....oh my, what does she call my blanket again?
Oh yea, a burp cloth! That doesn't sound too pretty. You know, pretty like my tights.

After my nap I went on a plane ride to Chattanooga, TN. I met my new aunties and mama. My auntie says my new mama looked at me and started tearing up.

I love my new home. I can't wait to meet lil MacKenzie!!! I hope she loves me and cuddles me. I wonder if she will read me books one day just like Fler?

Well, it is time for my nap so I have to go. Thanks for stopping by to meet me.

Merry Christmas everyone!
Lil' Miss Madeleine

Tuesday, December 6, 2011

Whimsy Stockings and...a Little Tutorial!

A few weeks ago I was doing my usual breeze through catalogs while the hubs was watching some sporting event on TV. I was looking at the Ballard Designs holiday catalog when ESPN hubs said he would love it if I could make these: 
Neither of us were loving the animal print trimming the stockings. I loved the whimsy concept but had to take it a step further with a little "fler" twist!

My first step was to create a pattern. I used old, not-so cute wrapping paper to free hand our design. I then traced it onto flannel material with my chalk pen. Since the pattern was the actual size of what I wanted it to look like finished, I cut about 1/2 inch from the outline and added about 4 inches to the top to be the area where my stocking cuff would be.
I used several tutorials to help me.

The main tutorial I used is HERE.
Now that you have your flannel (front) side template cut out you want to cut out the backside of your stocking. Put your right sides together and cut out the backing fabric.
Next I made the stocking lining. The lining is really nice because it adds some weight to the stocking and less flimsy. To cut out your lining. Have your lining fabric wrong sides together, place your template on top and cut your lining out.
You should have both the front/back of your stocking plus your lining cut out. I then used my Silhoutte SD and cut out white flannel circles with the Clean Cut Nonsewable Interfacing (also from Silhoutte). Lay your circles out and juggle them around till you find the layout you like. Make sure you trim edges if your circle hangs over your stocking front (notice the trimmed dot around heel). Next you want to iron those bad boys on! The packaging said just 8 seconds but I think I might have overdone it out of fear they'd fall off!!! LOL I think 8 seconds would have been fine....ha!
Time to add the pom poms! I just love these little guys. What you want to do is take the front/back of the main stocking and front/back of your stocking lining and lay them right sides down (note my wrong sides showing on top in picture). Lay your pom pom strand (bought those snow puffs at Joann's) across the top and cut proper length. You will cut 2 strands (one for main stocking and one for the lining so that you pom pom embellishments go around the whole cuff of your whimsy stocking).  IMPORTANT: Do not have a pom pom exactly at the edges because you will have to sew here. I learned this the hard time with our red stocking. Try to get as much webbing without the pom pom on your edges to make sewing easier.
Now place your pom pom strand sandwiched between the right sides of your main stocking fabric top edges and pin. The wrong sides should be on the outside. I found that leaving the little knots of the pom pom strand out a little made pinning easier and created just the right look when I turned our first stocking inside out. You will repeat this same step with your stocking lining fabric pieces.
Pinning this part is kind of a pain, but once you're done it should look like this. I pinned at each knot that I showed sticking out in the previous photo. Now you are going to sew.
I know the legit seam is wider than what I do but I just feel like that's a waste, so I did 1/4 inch seam and then sewed another line between the edge and my seam to add reinforcement because...well I really have no reason why. It just seemed like a good idea! ha! I bet there might be some pro-seamstresses gasping at my seam choice and reasonings...LOL! Do this for both your main and linings.
Iron your seams out. Cute eh?!?! So far so good. Hope this is making sense to ya!
Now we're going to put the right sides together of our main stocking and lining. Once placed together my fabric on the bottom in the picture will ultimately be my lining. I pinned all the way around, but in the lining (the bottom portion), I left about 4-5 inches open/unpinned so that I have a way to turn it inside out.

Now sew all the way round except where you left the opening unpinned. On the green flannel, I sewed along the original chalk markings I traced my wrapping paper template on.

Once your are done sewing, turn your stocking inside out and press your seams with an iron.
Before sewing your opening closed, take some fiberfill and stuff your stocking toe. If you don't your whimsy will look a little flimsy. IMPORTANT: when stuffing your toe, pull apart your stuffing so it's small sections of stuffing. This will give the finished stuffed toe less lumpy. If you pull off too big of chunks your stuffed stocking toe will look all bumpy and not smooth.

Once stuffed, you now going to stuff your lining into your main stocking. Once your lining is in place, fold over your cuff and press. Your stocking should look like this:

Press your cuff in place. For your hanging piece, I just hand stitched a piece of red ribbon I had into place.
YOU'RE DONE!!! Now run into your family room and hang it up to admire! I was so proud of my first stocking. Lots of help from the blog world pictures and tutorials, but feel like I put my own stamp on the design. ESPN hubs LOOOOVES his new stocking! I honestly think that's the best part...his excitement over it. He said he thought it was better than Ballard's and better than what he envisioned in his head. Oh that makes my heart melt!!! GAG right?!?! Seriously, the gifting is the best part!
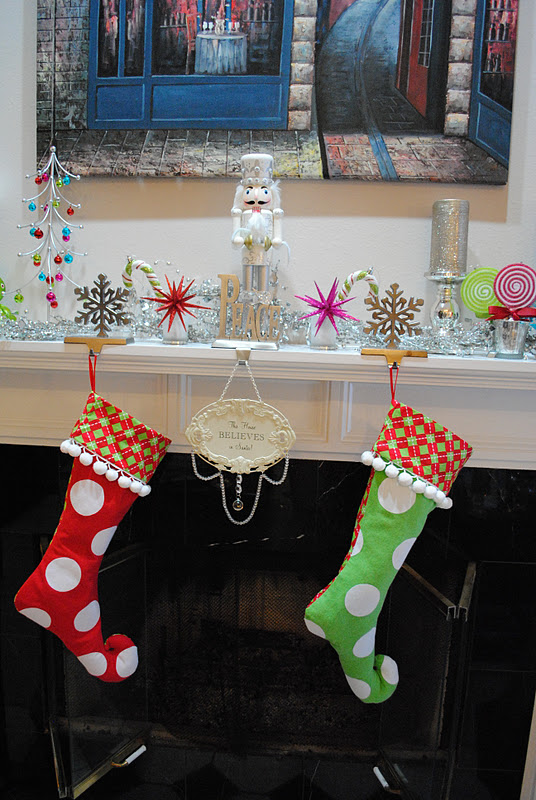
So when I hung up the stocking I noticed it looking kinda wimpy. I found a post from one of my FAV blogs, POSITIVELY SPLENDID, where she had the same problem and shared her solution...GROCERY PLASTIC BAGS!!! She stuffed her completed stockings with plastic grocery bags. See the difference between the red stocking (stuffed with bags) and the green (whimpy whimpy...unstuffed).

They hang so nicely stuffed with those unused, take-up-space, mess up under your kitchen sink, plastic bags!

We love our new whimsy stockings! We added a bit of whimsy to our mantel this year too. The printable on the far right is FREE over at Today's Creative Blog.

I hope you enjoyed the tutorial and that it didn't confuse you too much. I highly suggest you look at the tutorial I worked from as she did an AWESOME job on hers. Made our stockings much easier than if I had tried on my own!

Melkam Gena!!!
(Merry Christmas in Amharic which is Ethiopia's main language)

xoxo & Ho! Ho! Ho!
fler